Initial Setup
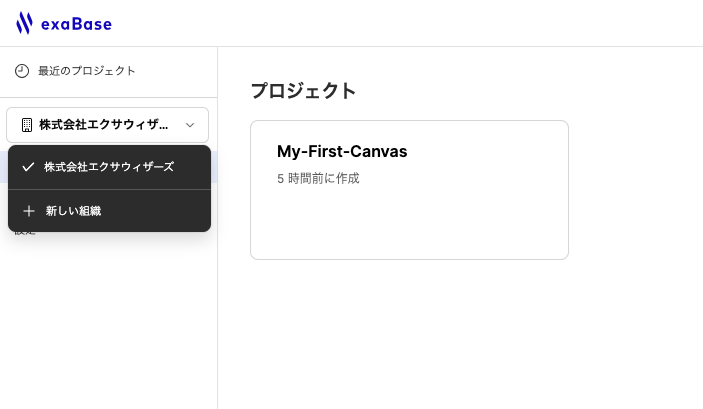
After the administrator has completed the account creation for the management screen of exaBase Studio, they will create an organization and a space. Creating a space allows for application development as a team. A project refers to the canvas screen required for newly constructing an application.
- Note: 1. Organization settings and 2. Space settings are required. 3. Organization members can construct applications.
- Organization Settings: Allows for overall settings for the organization as a company.
- Space Settings: Enables the creation of areas for specific teams or individuals.
- Project Settings: Allows for application construction within each space.
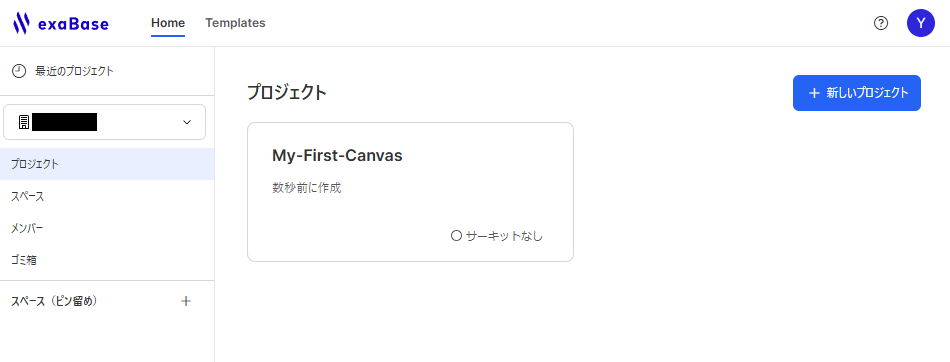
After creating a space, it is recommended to create projects within that space.
You can also directly create projects from the projects menu on the left, but it is recommended to create projects within the previously created space to ensure smoother permission settings when sharing with the team.
Organization and Project
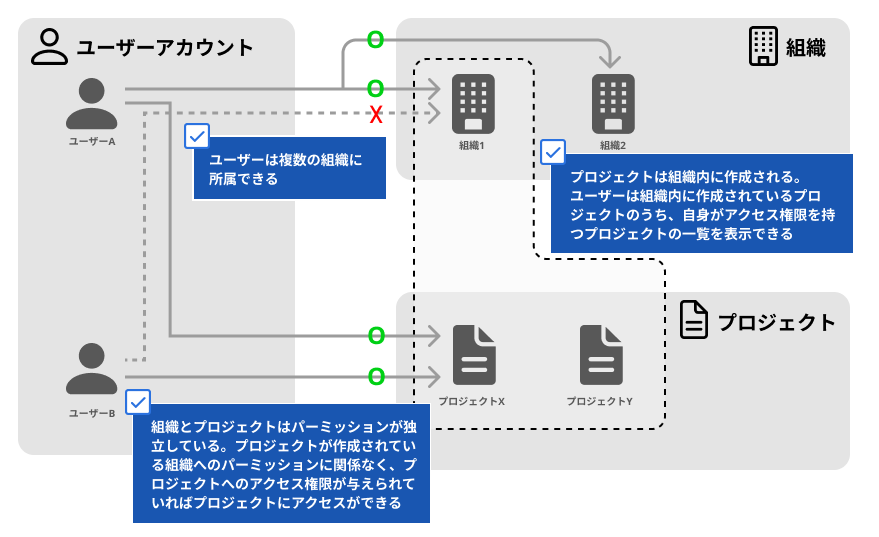
Organization
- An organization is an object that users can create according to various units, such as companies or departments.
- By belonging to an organization, users can view the projects for which they have access permissions within the organization.
- Users can belong to multiple organizations, with roles assigned in each organization.
Project
- A project is an object that manages data related to development on exaBase Studio, such as Canvas.
- Projects can be created within the organization. If the organization is deleted, all projects within that organization will also be deleted.
- By belonging to a project, you can edit, view, and deploy the Canvas according to your role within the project.
- Access restrictions for organizations and projects are independent; you can access a project even if you do not belong to the organization where the project is created, as long as you have access permissions for that project.
For detailed information about the permissions assigned to roles within organizations and projects, please refer to Account Permission Settings.
Creating and Managing Organizations
Creating an Organization
- You can create a new organization by selecting “+ New Organization” from the dropdown menu listing organizations.
General Organization Settings
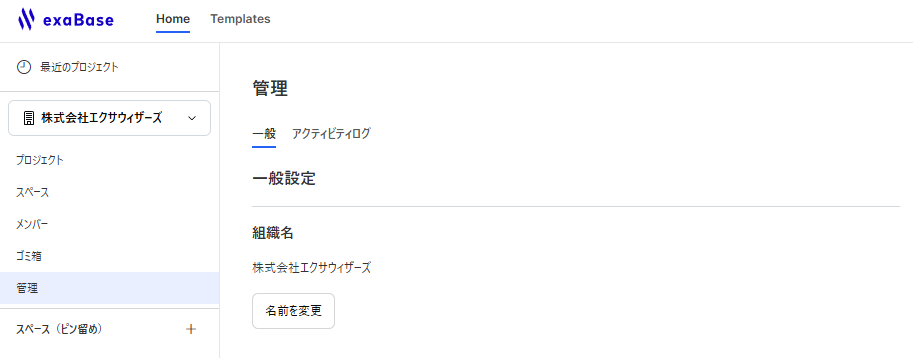
- To access the settings of the selected organization click the
Adminlink in the sidebar.
Organization Access Restrictions
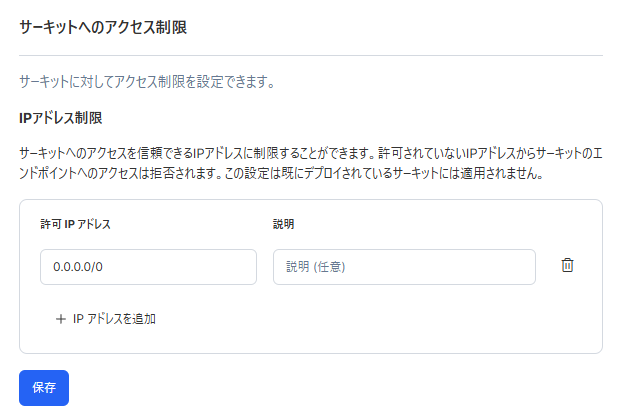
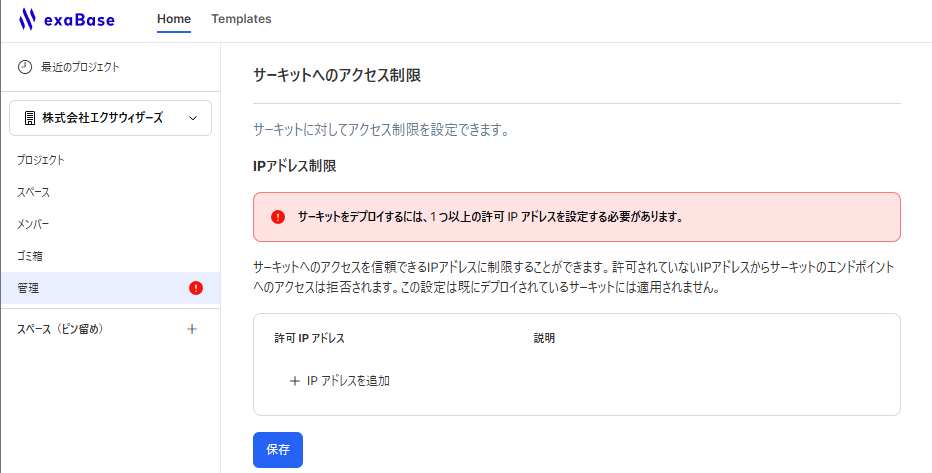
Circuit Access Restrictions
-
Access restrictions can be set for the circuit. By configuring allowed IP addresses, access to the circuit can be limited to trusted IP addresses.
-
Access to the circuit's endpoints from unauthorized IP addresses will be denied. This setting is applied during deployment and will not affect circuits that have already been deployed.
-
If organizational-level circuit IP address restrictions are not configured, the deployment of circuits is disabled. A warning will be displayed in the sidebar and the organization settings.
-
IP whitelisting, IPv4 and CIDR notation supported.
-
How to configure IP address restrictions:
- Click
Add IP Address. - A form will appear. Enter the following:
- IP Address (required)
- Description (optional)
- Click
Save.
- Click
Depending on your contract details and plan, you may not be able to create a new organization. Please check your contract information for more details.
Access Restrictions to StudioApp
Email Domain Restrictions
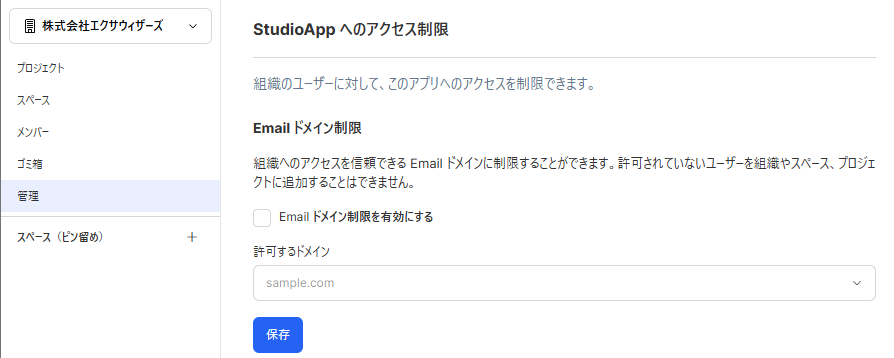
- You can restrict membership in the organization, its spaces, and projects to only users with allowed email domains.
- To set up email domain restrictions, follow these steps:
- Select the organization from the list, and access
Adminin the side menu. - Check the box for
Enable Email Domain Restrictions. - Enter the allowed domains in the form and add them.
- Press
Save.
- Select the organization from the list, and access
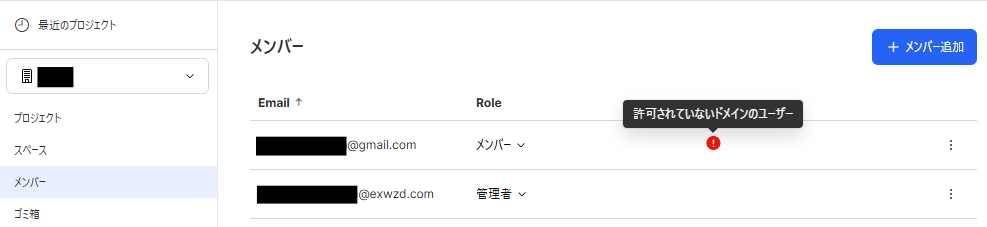
- If users from disallowed domains are already members, they will continue to have access.
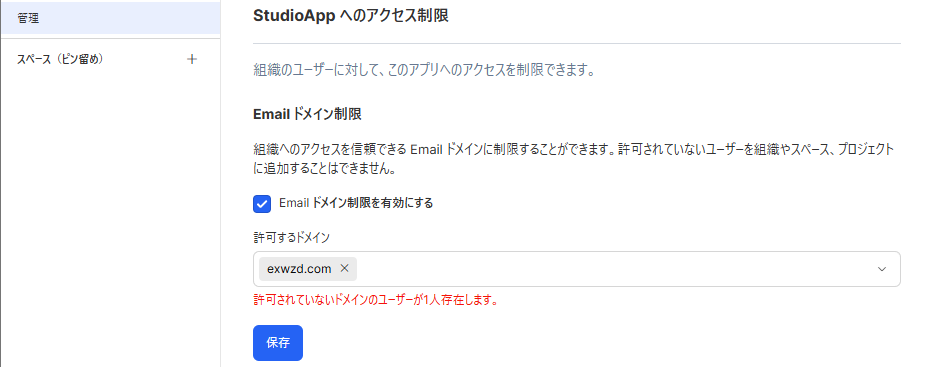
- Users from disallowed domains can be checked on the organization admin screen or the member list screen.
- Email domain restrictions can also be set at the cluster level, but this is not provided as a feature for users. If cluster-level restrictions are needed, requests must be made to the team for implementation.
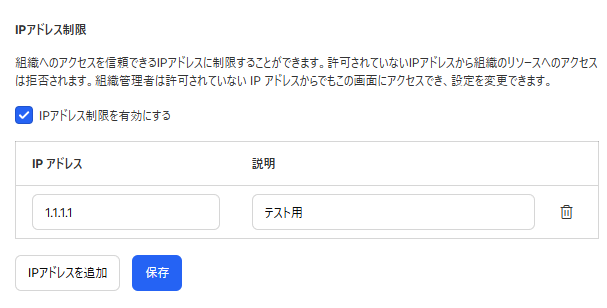
IP Address Restrictions
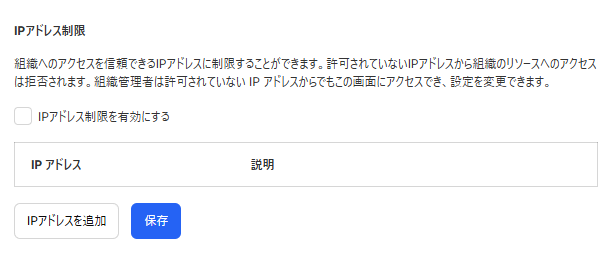
- IP address restrictions can be set for the organization and its subordinate spaces and projects. However, these settings do not apply to published applications.
- IP restrictions use a white listing method and support IPv4 and CIDR notation.
- Access from unauthorized IP addresses will be denied, but administrators are able to access the admin menu in order to change the IP restriction settings.
- How to configure IP address restrictions:
- Select your organization from the organization list and navigate to
Adminin the side menu. - Check the box for
Enable IP Address Restrictions. - Click
Add IP Address. - A form will appear. Enter the following:
- IP Address (required)
- Description (optional)
- Click
Save.
- Select your organization from the organization list and navigate to
Organization Deletion
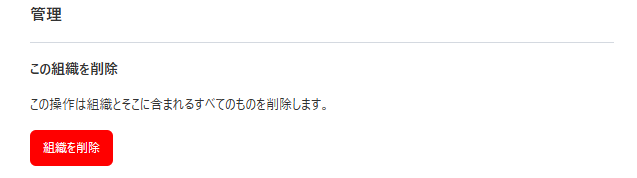
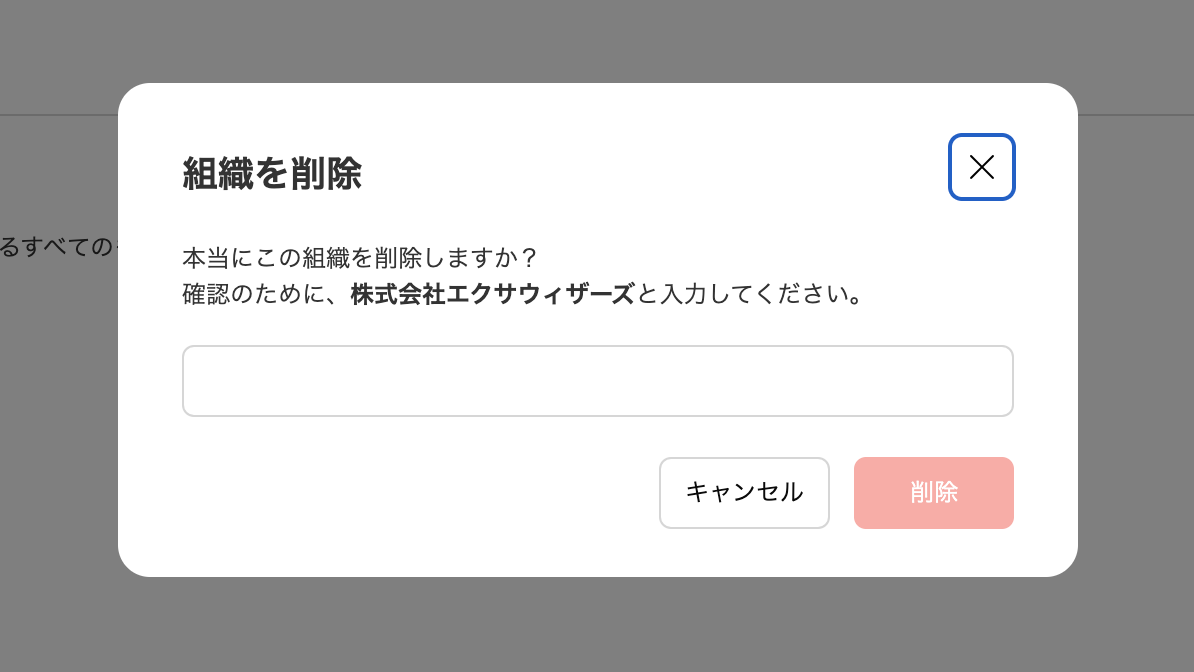
-
You can also delete an organization, but doing so will delete all projects within the organization, making them inaccessible ever again.
-
To delete an organization, you need to accurately type the organization's name in the window that appears after pressing the “Delete Organization” button.
Activity Log
-
The activity log is a record of user actions within the application.
-
It is found in the
Activity logtab in the Admin menu.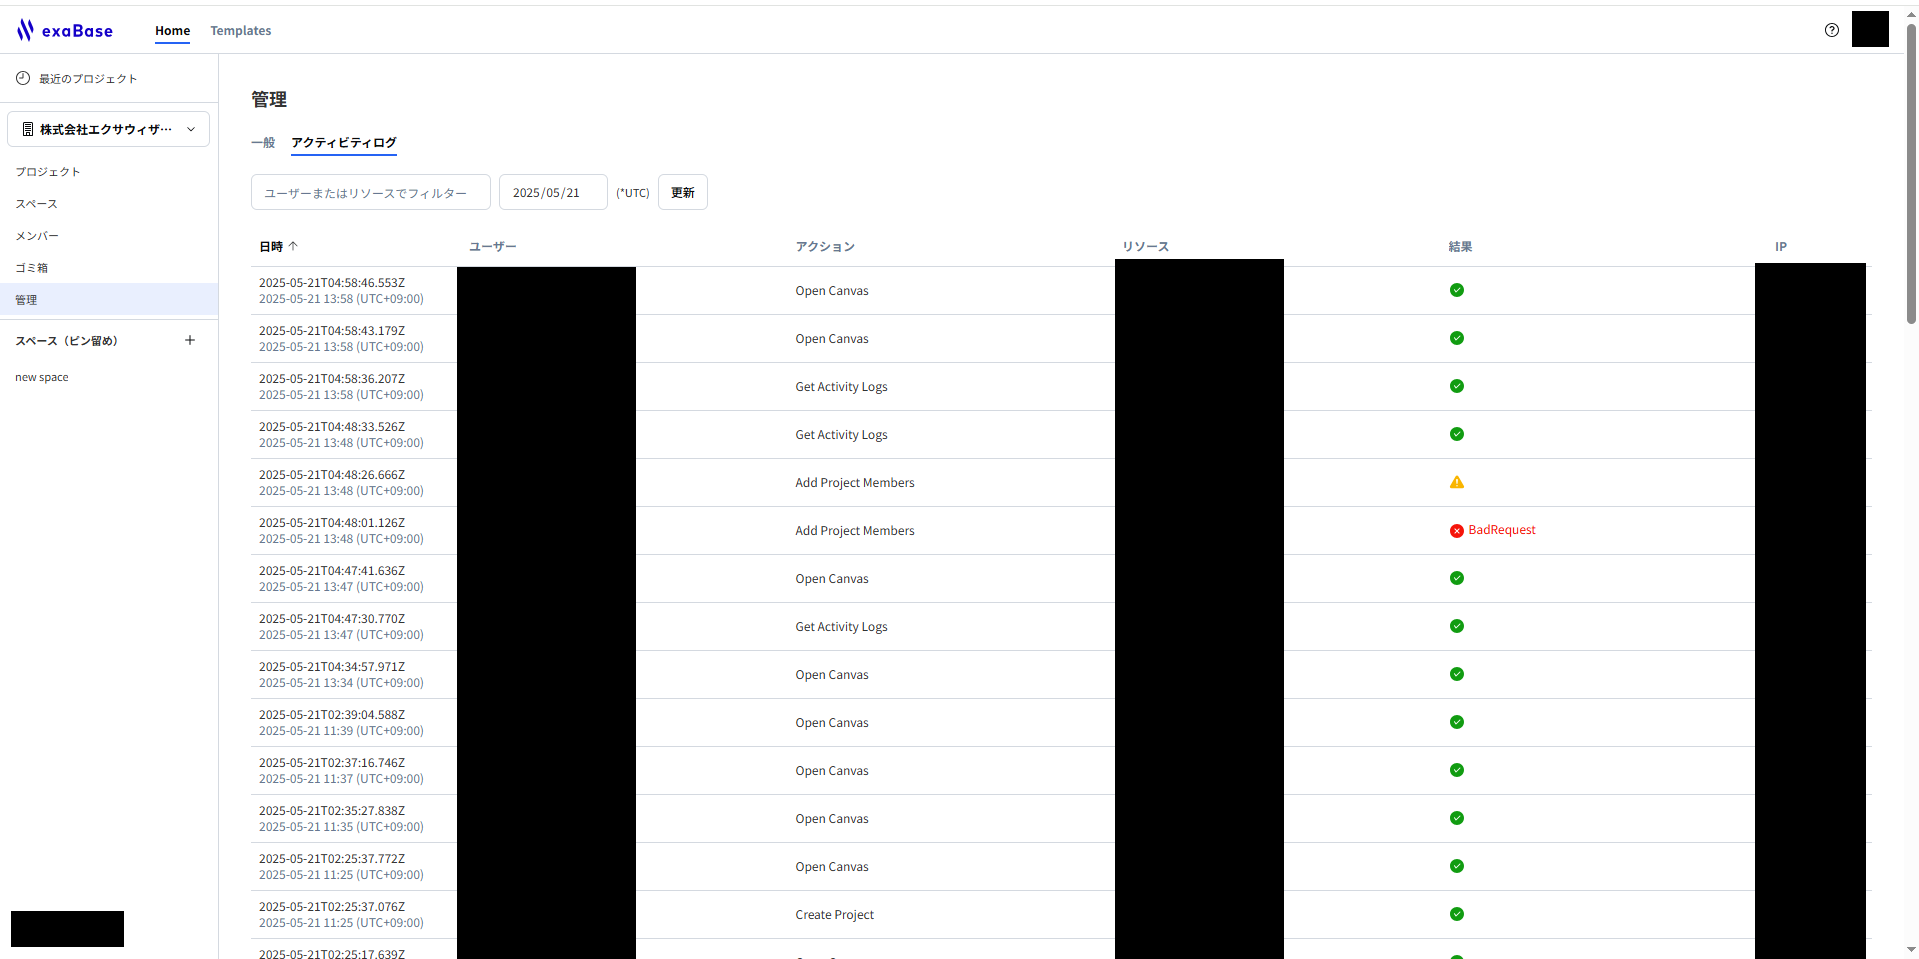
-
Filter options:
- Acting user: email address
- Affected resource: resource Id and resource name
- Date: current date (default), can be set to any arbitrary date
-
The Result column indicates the outcome of the action.
 Success: All operations completed successfully.
 Partial Success: Some operations completed successfully, while others encountered errors.
 Failure: All operations failed.
-
By selecting each row in the log list, you can view the log details.

Admin Organization Members
Adding Members
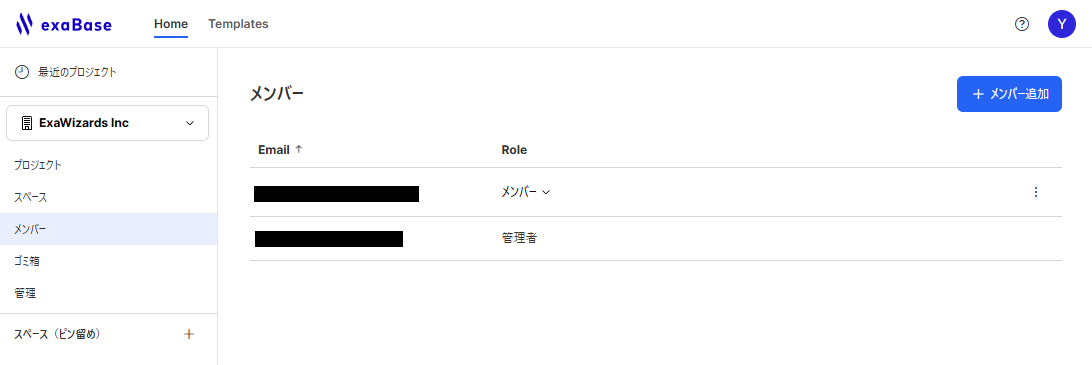
-
To add members, select the organization from the list, access the
Memberssection in the side menu, and click on+ Add Memberin the top right corner.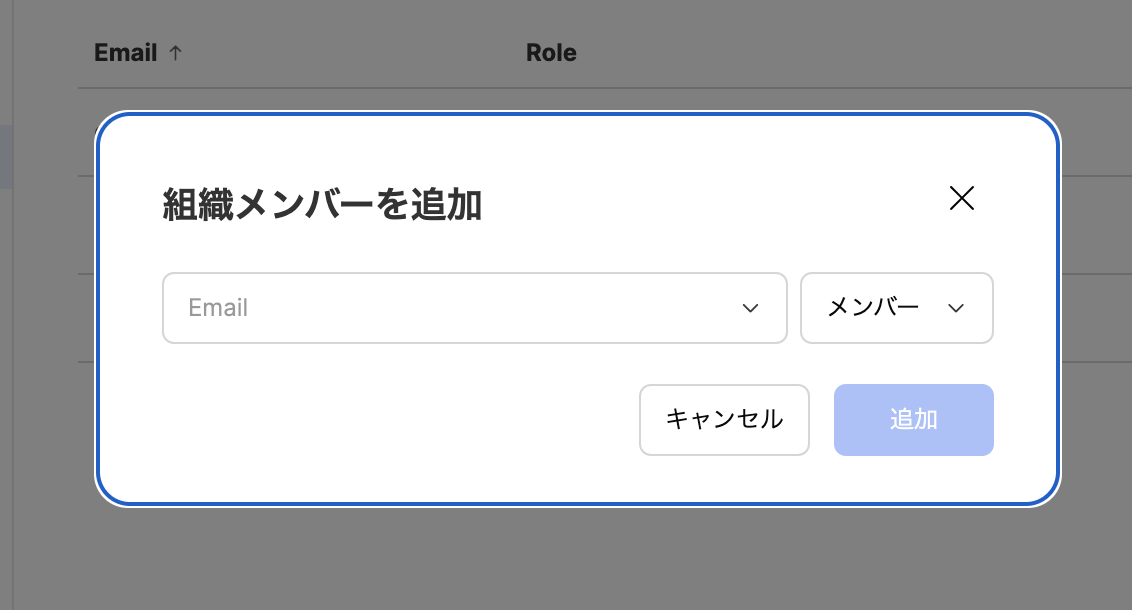
-
Enter the email address of the member to be added and select the role to assign, then choose
Addto complete the addition to the organization. -
The organization roles are Administrator, Member, Guest.
Role Permission Assignment Administrator - Automatically becomes an administrator when the organization is created.
- Can add new administrators.
- Changing roles from administrator to another role requires another administrator to perform the role change; administrators cannot change their own roles.
Member - Granted by the administrator inviting them as a member when adding them.
Guest - Granted when sharing projects created within the organization with members not belonging to that organization; they will then appear in the organization's member list.
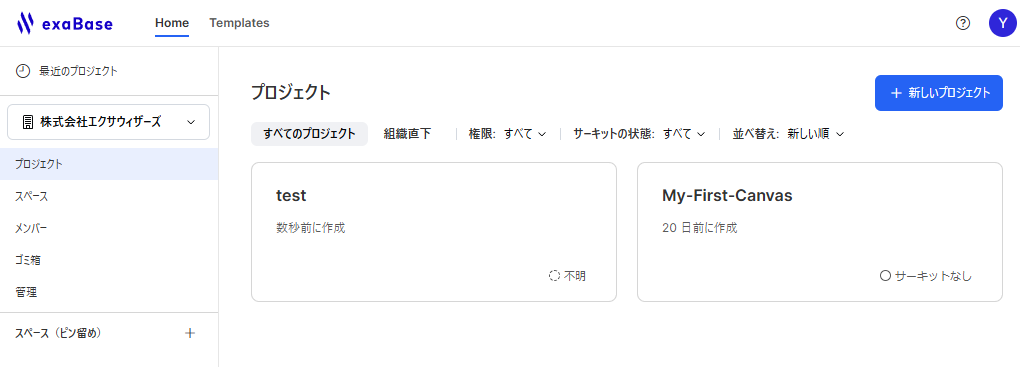
Management of Projects
- In the project screen, administrators can list and manage the organization's projects.
- Projects can be filtered and sorted using the tabs or dropdown menus at the top of the screen.
- Tabs:
- All Projects: Displays all projects within the organization. This includes both projects created directly under the organization and those created within each space.
- Organization Top-Level: Displays projects that do not belong to any space and are directly under the organization. This includes projects created on the
Projectspage.
- Dropdown Menu:
- Permission: Projects can be filtered based on access permissions (Viewable/Editable).
- Circuit Status: Projects can be filtered based on the deployment status (Circuit / No Circuit / Unknown).
- Sort: Projects can be sorted by creation order or alphabetical order.
- Tabs:
Managing Spaces
- Spaces can be created within an organization, and projects can be created within those spaces. You can manage access to spaces and projects within them.
- For detailed information on permissions and specifications related to spaces, refer to Roles.
Creating a New Space
Setting the Space Name
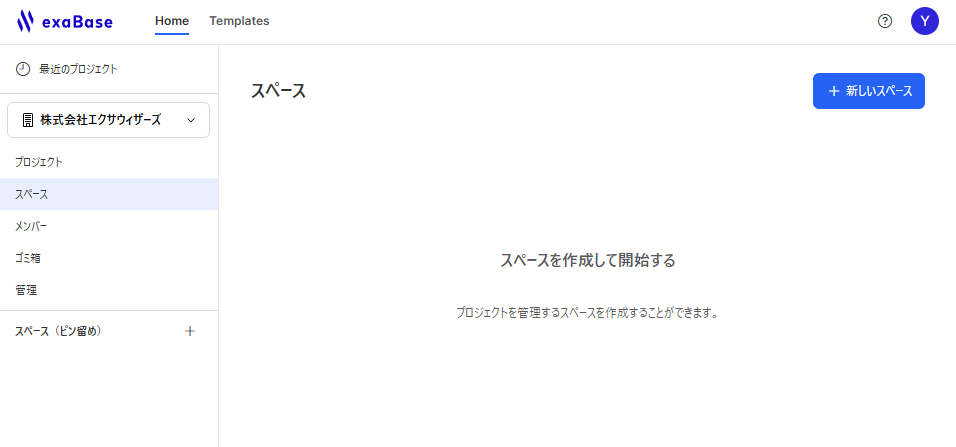
- Spaces are created within an organization. Select the target organization from the dropdown menu listing organizations.
- From the sidebar, select
Spaces, and after clicking on+ New Spacein the top right corner, set the space name.
Sharing Settings
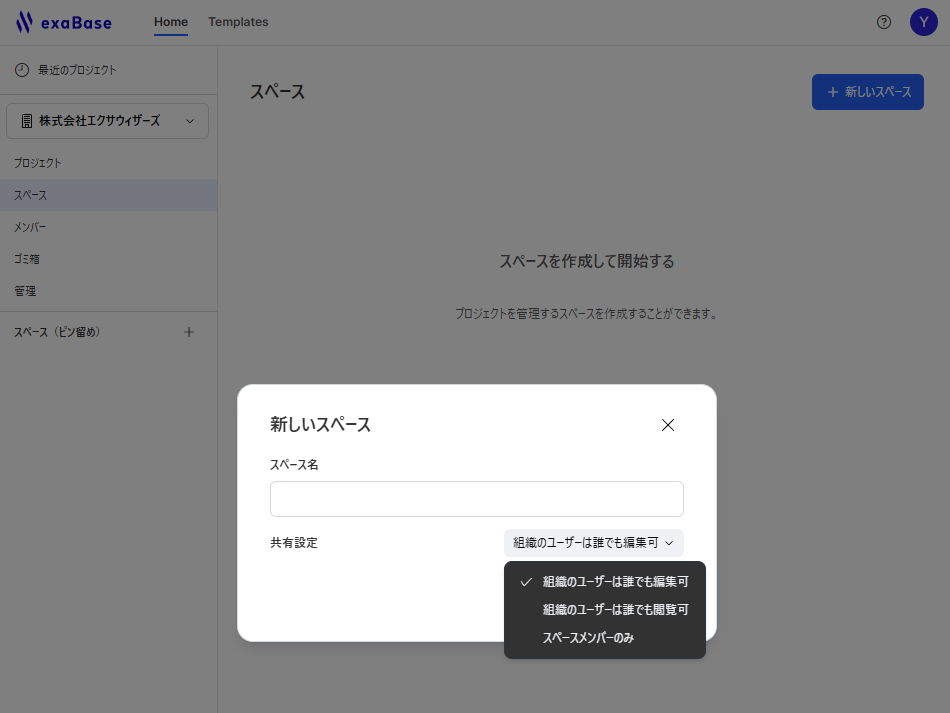
- You can set Sharing Settings for members belonging to your organization in relation to this space from the dropdown menu.
Sharing Spaces
- Spaces have Roles, and members affiliated with the space will have one of those roles assigned.
Configuring Space Roles
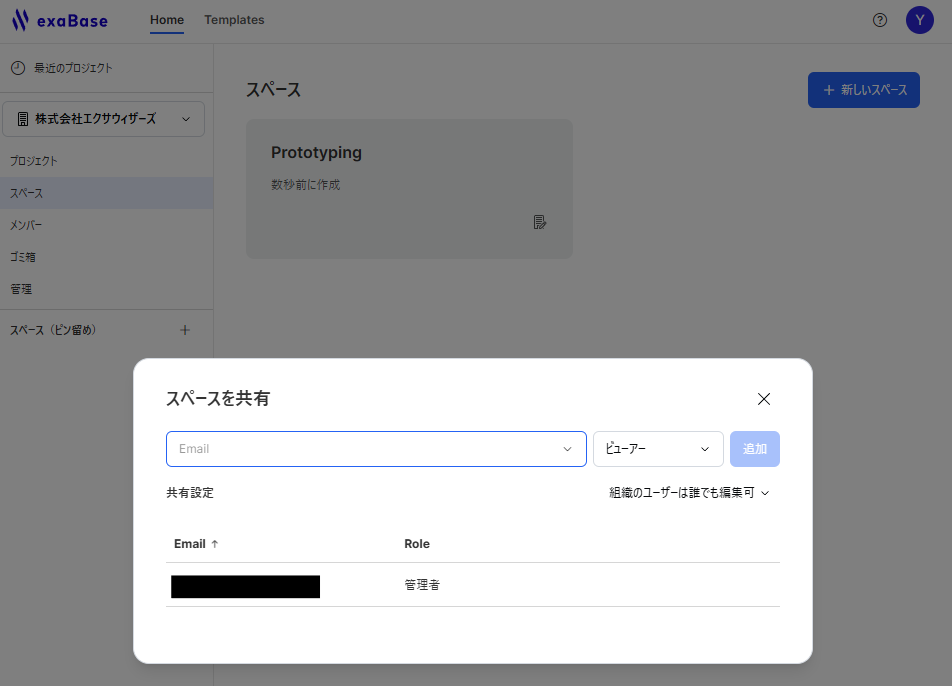
- Select
︙in the space and chooseShareto invite other users to the space and assign roles to them.
Deleting a Space
- After right-clicking the space, pressing “Delete” in the menu will display a confirmation modal for deleting the space. However, you must ensure that there are no projects in the space and that the user is either an organization administrator or space administrator to delete the space.
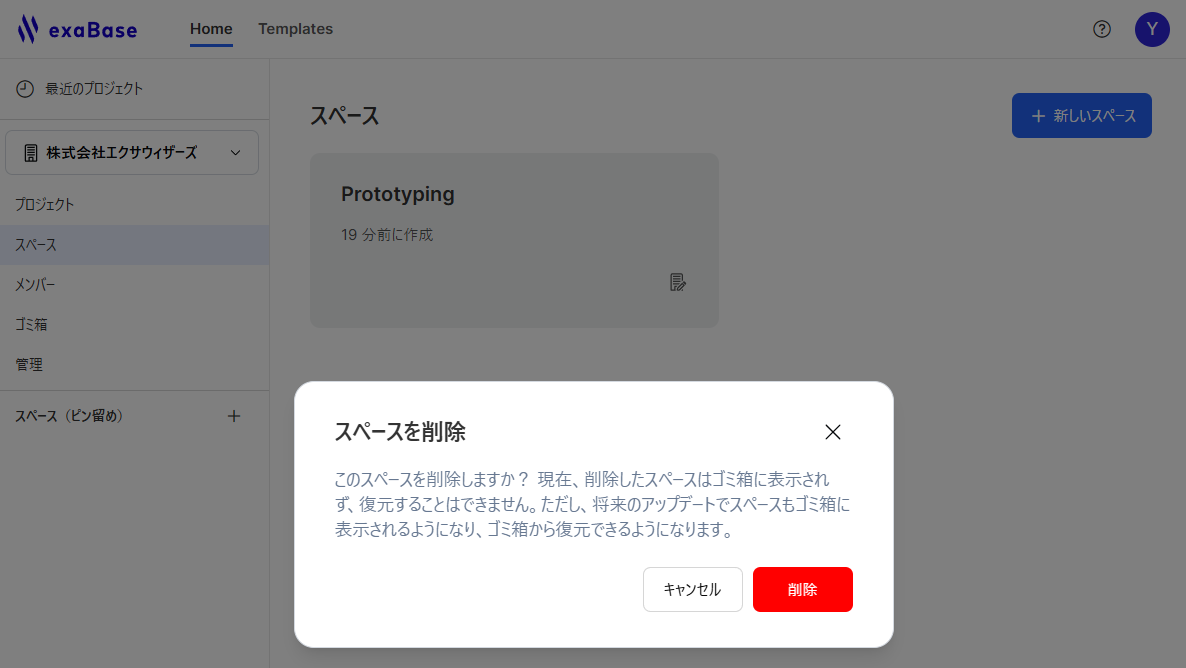
- If you delete projects within a space and then delete the space, restoring deleted projects from the trash will restore them to the organization root. Only organization administrators or project administrators can perform this restoration. If a user was the administrator of a deleted space but is neither an organization administrator nor a project administrator, they cannot perform the restoration.
Creating and Managing Projects
Creating a New Project
- Projects are created within an organization, so select the relevant organization from the dropdown menu listing organizations.
- From the sidebar, select
Projectsand after clicking on+ New Projectin the top right corner, set the project name and complete the creation.
Project Settings and Deletion
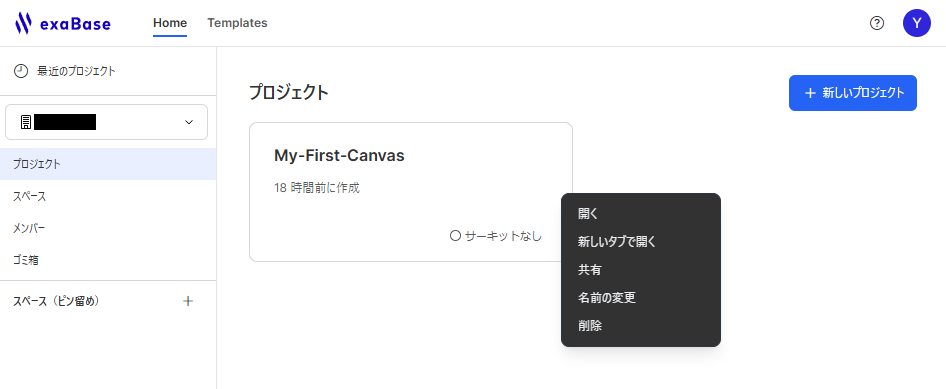
- You can display various menus by right-clicking on the project in the project list screen.
- To delete a project, select
Deletefrom this menu.

- The indicator showing the existence of a circuit corresponds to the following states:
- Circuit exists: A circuit is present.
- No circuit: No circuit is present.
- Unknown: It is unclear whether a circuit exists. This state is displayed if you do not have permission to view the circuit's state or if there is some issue.
Sharing Projects
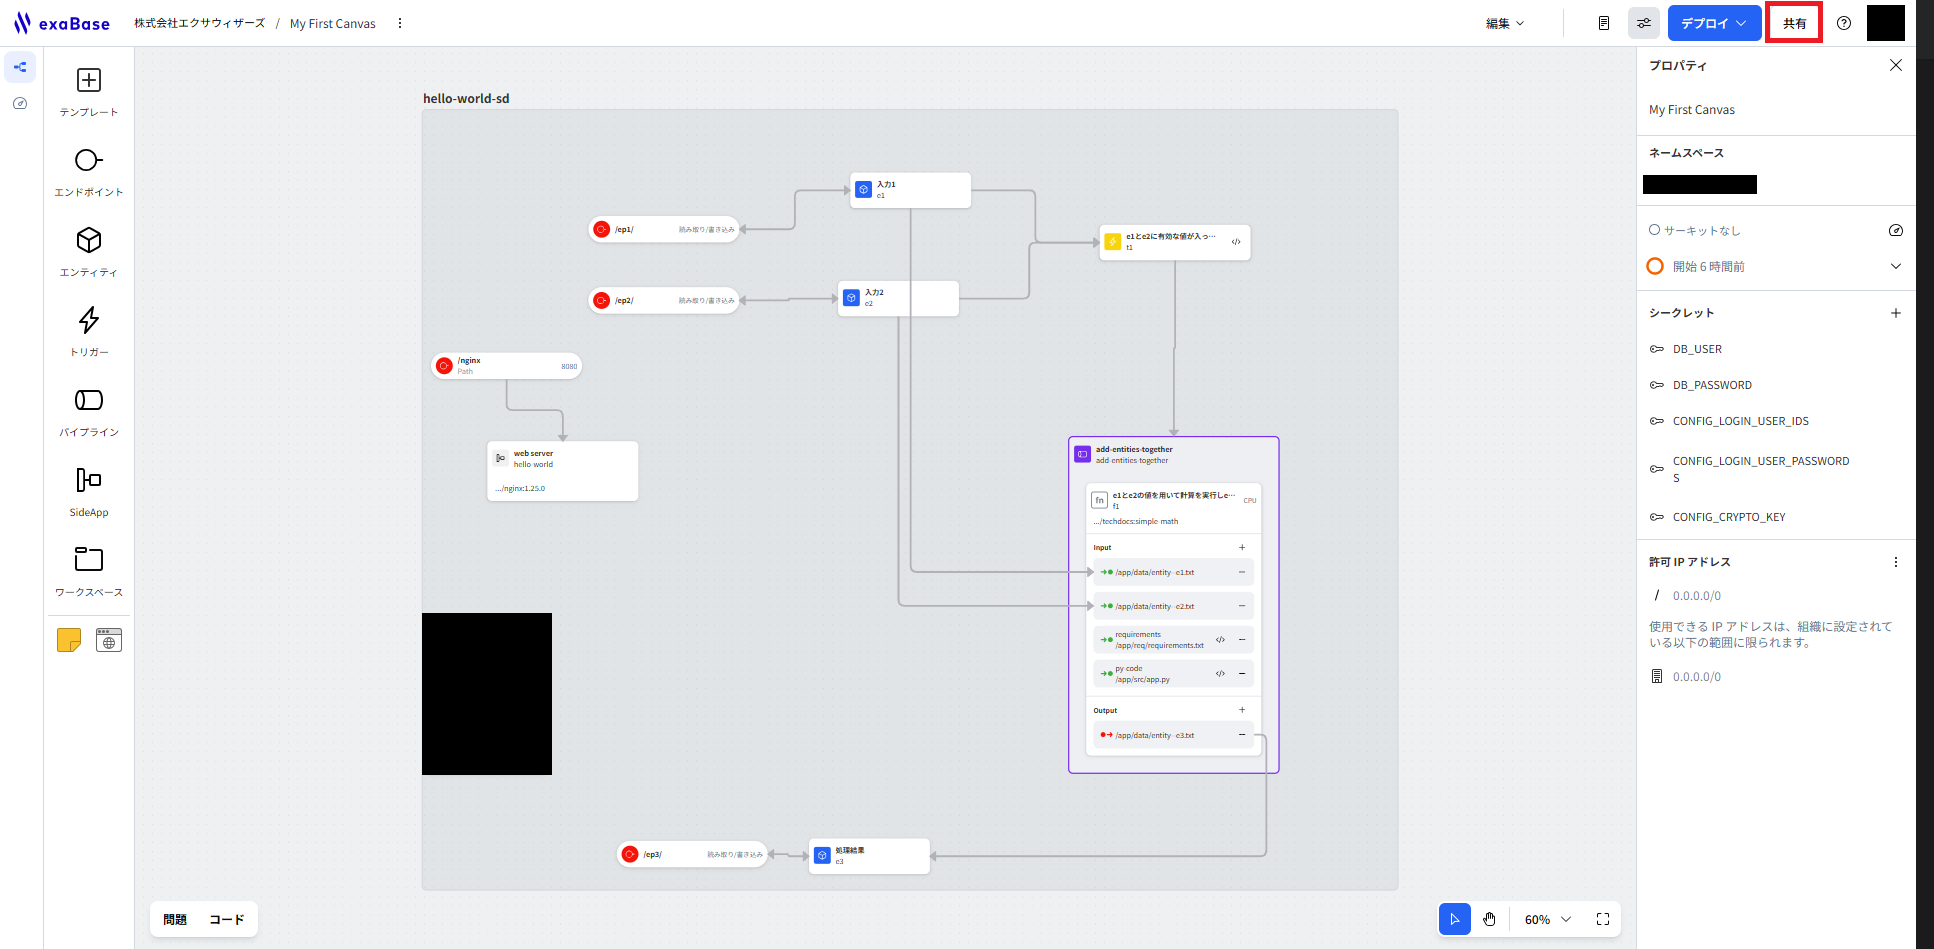
- Open the project to be shared and select
Sharein the top right corner.
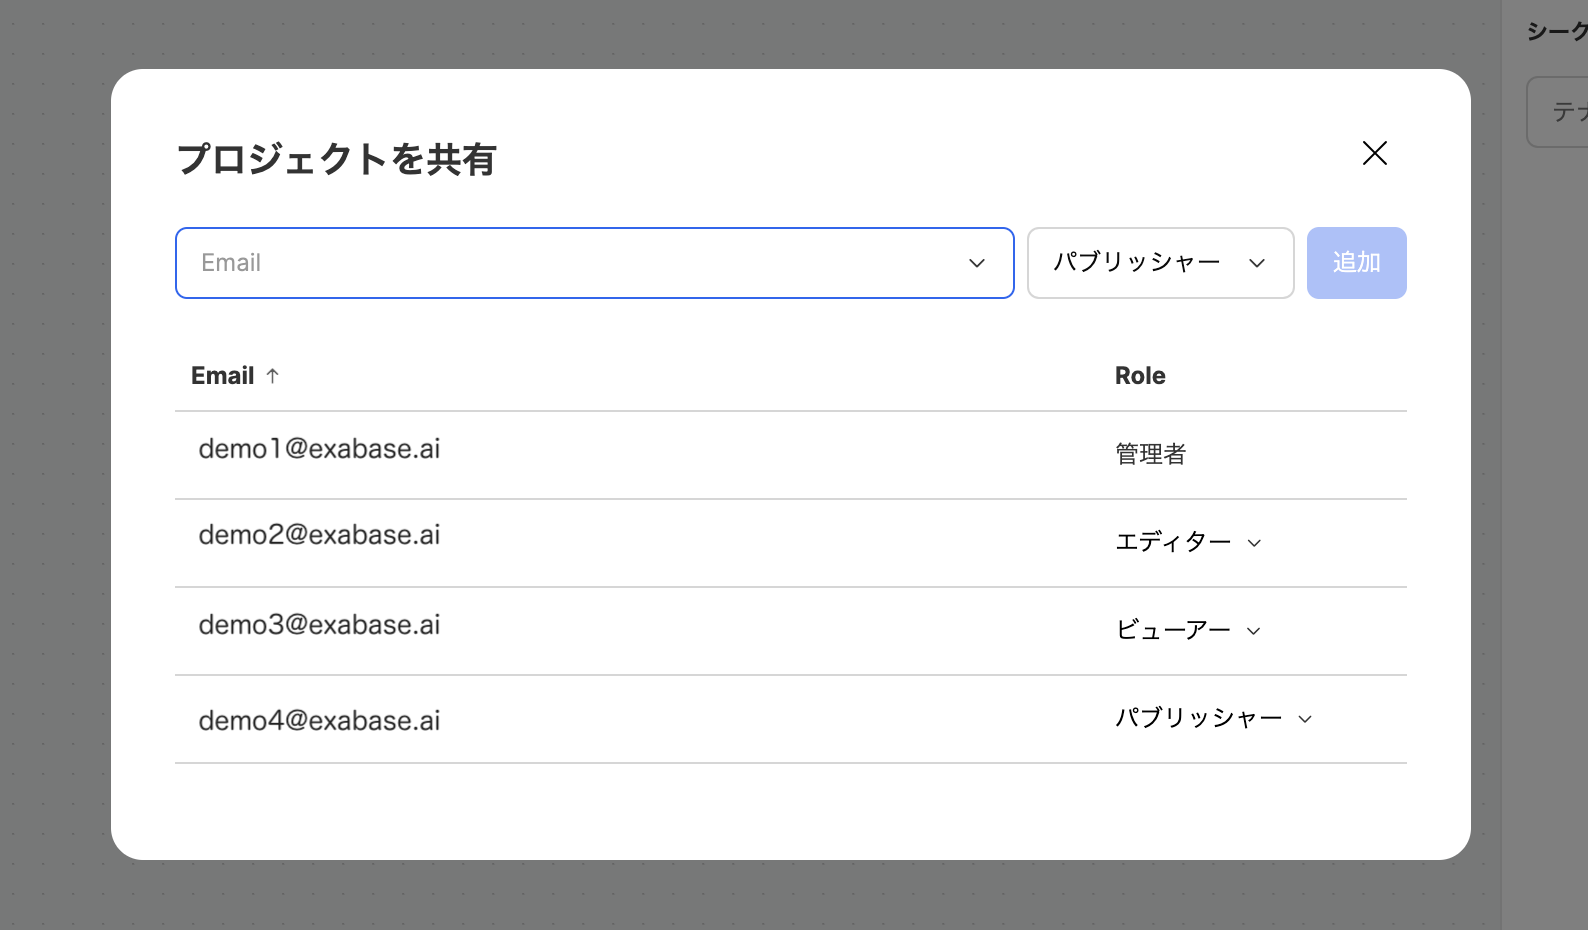
- Enter the email address of the user to be added to the project, set the role, and choose
Add. - Project roles are Administrator, Editor, Viewer, Publisher.
| Role | Permissions |
|---|---|
| Administrator |
|
| Editor |
|
| Publisher |
|
| Viewer |
|