Add Your Own Models and Functions
- This is a tutorial on how to push images to the container repository used with exaBase Studio and use them as Functions.
- We will add an image to the Function used in the HelloWorld tutorial that utilizes Canvas and run it.
If Building on a PC with an ARM CPU
- If you are using an ARM CPU like an M1 Mac, please add --platform linux/amd64 when using docker build.
- If you build without any options, an ARM Docker image will be generated, but it will not work due to environmental differences since the Studio runtime environment is Intel/AMD64.
Preparation
1. Obtain Tools and Samples
Install the tools
- To build and push containers, we will use DockerDesktop or RancherDesktop.
- To push images to ECR, please install AWS CLI.
- To run Python code locally, install Python Stable Version.
Samples
- tutorial_add_custom_function.json
(Right-click and selectSave link asto download the file) - sample_python_code.zip
2. Check Information Needed for ECR Access
Functions will execute using the specified Docker images from AWS ECR in exaBase Studio's runtime. Please register all Docker images that will be used by the Functions.
| ECR | URI | (Please confirm with your contact person) |
| Repository Name | (Please confirm with your contact person) | |
| AWS_ACCESS_KEY_ID | (Please confirm with your contact person) | |
| AWS_SECRET_ACCESS_KEY | (Please confirm with your contact person) |
3. Application Development
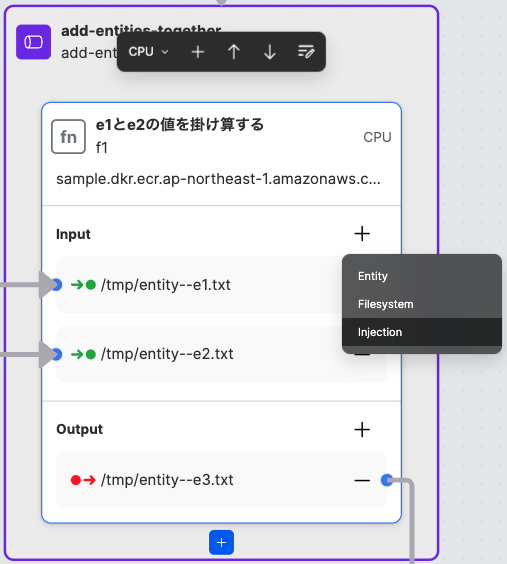
In this tutorial, we will containerize the operation that multiplies the values of e1 and e2 and outputs them to e3, push it to ECR, and run it.
Container Requirements for Use in Function Nodes
The container that will run as a Function must have the following:
- Use Docker
- Set the execution command with CMD/ENTRYPOINT in the Dockerfile
- Implement input and output processing to match the
inputandoutputpaths on the Function node
Set Up the Directory Structure
Functions perform data input and output in file format. Ensure that the implementation and folder structure are such that files can be exchanged correctly according to Container Requirements.
Example folder structure
{project_root}
 ├ app
 │ ├ data
 │ └ app.py
 ├ requirements.txt
 └ Dockerfile
Modify the Source Code to Execute as a Script
Please modify app.py so that it can be executed as a script from the command line. If you follow the sample code, change the operation that sums e1 and e2 to multiplication.
Sample Code app.py
import logging
import os
def main():
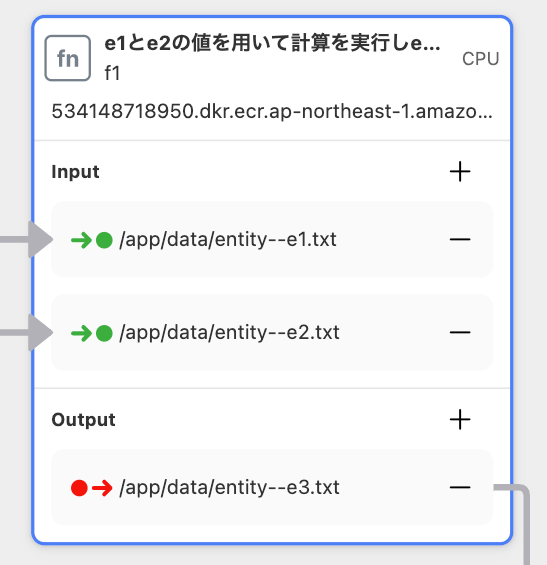
input_path1 = './data/entity--e1.txt'
input_path2 = './data/entity--e2.txt'
output_path = './data/entity--e3.txt'
with open(input_path1 , 'r') as f:
e1FileByteData = f.read().strip()
# end with
with open(input_path2 , 'r') as f:
e2FileByteData = f.read().strip()
# end with
e1Int = int(e1FileByteData)
e2Int = int(e2FileByteData)
e3Int = e1Int + e2Int
e3String = str(e3Int)
with open(output_path , 'w') as f:
f.write(e3String)
# end with
print('done')
# end def
if __name__ == '__main__':
main()
# end if
If using Jupyter Notebook, consider downloading as .py using “Download as” or converting to a .py file with nbconvert. Also, be aware that scripts created in this manner will be executed sequentially from the top cell downward. Pay attention to the order of cells.
Tutorial
1. Containerize
Retrieve the List of Libraries Used Locally
Please execute the following commands from Terminal or Command Prompt in order:
# Install the Python package pipreqs
{project_root}  > pip install pipreqs
# Create a dependency package list file comprising only the necessary packages for the Python script you want to execute
{project_root}  > pipreqs
Create a Dockerfile
- Create a Dockerfile and execute it from the CLI.
- First, navigate to your project root folder and define the execution environment and command for the script.
- Mac
- Windows
{project_root} > touch Dockerfile
{project_root} > New-Item -Name Dockerfile -ItemType File
- Next, create the Dockerfile based on the sample code.
Sample Dockerfile
# https://hub.docker.com/_/python

FROM alpine:latest
RUN apk add --update python3

# Create and move to the folder for installation
RUN mkdir -p /app/data
WORKDIR /app

# The first COPY copies requirements.txt from the local environment to /app in the container.
COPY requirements.txt /app/
RUN rm /app/requirements.txt

# Copy the local app folder contents to WORK_DIR.
COPY app ${WORK_DIR}

# Move to the container's work_dir.
WORKDIR ${WORK_DIR}

# This command executes when the container runs.
CMD ["python", "app.py"]
Build the Docker Image
- Build the image.
# Remember to include the -t option; it will be used when pushing the image to ECR.
{project_root}  % docker build -t <name_of_your_image>:<tag_or_version_of_the_image> .
- After the command completes successfully, verify that the Docker image has been created using the following command:
% docker images
Run the Container Locally
Perform a functionality check. Follow these steps:
- Place the input files (entity--e1.txt, entity--e2.txt) in a test folder.
- Specify the folder and mount it to the container via CLI, executing the following command:
# Use the -v option to mount the host (local) volume to the container.
% docker run -v [absolute path]/app/data:/app/data <name_of_your_image>:<tag_or_version_of_the_image>
In this case, we mounted the data folder under project_root/app individually into the container. If the program completes successfully and the output file appears in your local project_root/app/data, you have succeeded.
2. Push to ECR
- Run the following command in CLI to log in to AWS ECR.
- Mac
- Windows
aws ecr get-login-password --region ap-northeast-1 | docker login --username AWS --password-stdin 534148718950.dkr.ecr.ap-northeast-1.amazonaws.com
Windows PowerShell:
(Get-ECRLoginCommand).Password | docker login --username AWS --password-stdin 534148718950.dkr.ecr.ap-northeast-1.amazonaws.com
- Tag the local image Please tag the local image that will be pushed to ECR.
# Specify the repository name provided individually after the hostname.
% docker tag <name_of_your_image>:<tag_or_version_of_the_image> 534148718950.dkr.ecr.ap-northeast-1.amazonaws.com/<repository_name>:<name_of_your_image>
- Push the image Push the tagged image to ECR.
% docker push 534148718950.dkr.ecr.ap-northeast-1.amazonaws.com/<repository_name>:<name_of_your_image>
It’s convenient to note down the image name you set, as it will be used when configuring the Function in Canvas.
3. Specify the Function URI in Canvas
-
Import the sample Canvas.
-
Enter the ECR URI in the Function's “Image”.
-
Create and deploy the Canvas Deploy from the Deploy button in the upper right corner. Use the tenant name provided.
-
Access from the frontend
(Access the frontend SideApp)
Enter values for e1 and e2 and press the "Submit" button. If the result of multiplying is returned in e3, you have succeeded.
Using Injection, you can create the Function’s input from the Canvas by editing the file mount point and contents.